The Ultimate Overview to Gadget Repair Work: Navigating Display Repair Service and Learning Motherboard Repair
If you've ever faced a flickering display or a gadget that just will not power on, you recognize just how frustrating these concerns can be. Luckily, you don't have to count only on experts for repairs. With the right tools and methods, you can tackle these typical problems yourself. Where do you begin, and what should you know prior to diving in? Let's discover the essentials of gizmo repair with each other.
Comprehending Usual Device Concerns
When you depend on gadgets for daily tasks, it's annoying when they start acting up. Typically, these issues stem from software program problems or obsolete applications.
Screen issues like flickering or unresponsiveness can emerge from physical damage or software application concerns. Sometimes, an easy reactivate can solve the problem. Connection concerns might take place with Wi-Fi or Bluetooth, often resolvable by toggling the settings or resetting the device. Comprehending these typical problems equips you to repair effectively and restore your gadget's performance.
Tools You'll Need for Screen and Motherboard Fixing
As soon as you have actually identified problems like screen flickering or unresponsiveness, having the right devices handy makes all the distinction out of commission your gadgets. First, grab an accuracy screwdriver collection, as different devices require numerous screw kinds. A plastic spudger is important for spying open displays without harmful delicate components. Don't neglect tweezers for dealing with little parts and screws.
For display repair service, a warm gun or hairdryer can aid soften glue, enabling you to separate components conveniently. If you're delving into motherboard fixing, a multimeter is essential for detecting electrical issues.
Last but not least, spend in an anti-static wrist band to secure sensitive electronics from static electricity. With these tools, you'll be fully equipped to tackle both display and motherboard repairs with confidence.
Step-by-Step Guide to Screen Fixing
To effectively repair a screen, beginning by gathering your devices and preparing the workspace. You'll need a screwdriver collection, a plastic pry tool, and a new display. Make sure your location is clean and well-lit.
Make use of the screwdriver to carefully detach the screws holding the screen in location. Carefully put the pry device between the screen and the gadget framework to pop it loosened.
As soon as the display is free, detach the cord by delicately lifting it from its port. Now, take the brand-new display and connect it to the gadget, guaranteeing it's firmly in position.
Carefully line up the display with the tool frame, press it down, and replace the screws. Power it on to check your work. You've just completed an effective display repair!
Fixing Typical Display Issues
Although you have actually just completed a display fixing, you could still run into some typical problems that can affect its efficiency. If you identify them, it could be a sign of a damaged link or a faulty screen.
If your display has a yellow tint, it could be a software concern or a calibration issue. Consider readjusting the setups in your display choices. Furthermore, if touch sensitivity seems off, recalibrate the screen or check for any kind of particles around the edges.
Lastly, if the display screen is unresponsive, execute a difficult reset on your device. If issues persist after these fixing steps, you might need to revisit your fixing or seek specialist assistance. Remember, recognizing the problem early can conserve you effort and time down the line.
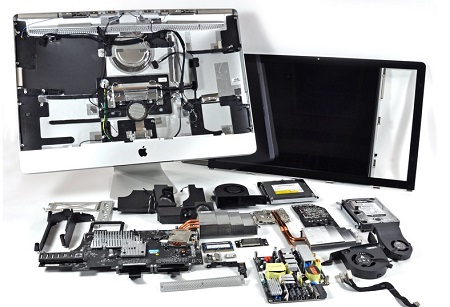
Mastering Motherboard Repair Service: Trick Techniques
When tackling motherboard repair work, having the right tools is necessary to your success. You'll often run into typical concerns that can be taken care of with a clear step-by-step process. Let's discover these strategies to aid you master the art of motherboard repair.

Vital Tools Called For
While you could believe that repairing a motherboard calls for specialized skills, having the right tools can make the procedure far more manageable. Beginning with a precision screwdriver established to deal with tiny screws. A welding torch is important for any component substitutes or repair work, so purchase a great one. You'll also need solder and desoldering devices to assist with connections. A multimeter is important for diagnosing electric issues and inspecting part performance. Maintain a pair of tweezers convenient for dealing with tiny parts. An anti-static wrist band will shield your motherboard from static damages. Ultimately, a magnifying glass or lighted magnifier can assist you see great details. With these tools, you're fully equipped to participate in motherboard repair work with confidence.
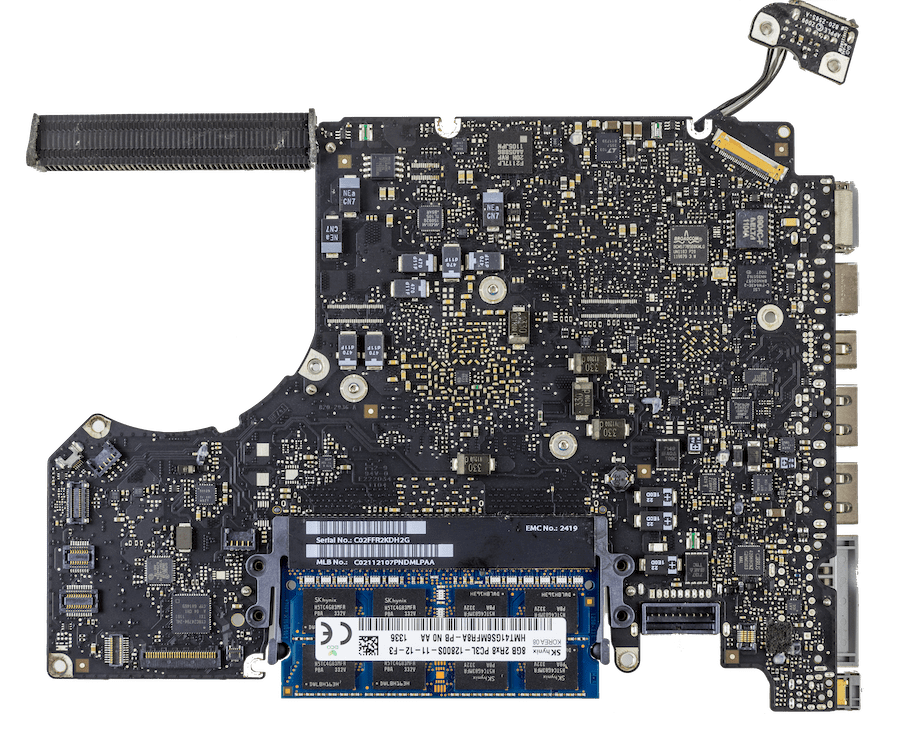
Usual Problems Recognized
A number of usual issues can occur with motherboards that every fixing fanatic should identify. Initially, you could experience power failures due to malfunctioning capacitors or harmed traces. If your tool will not transform on, check for scorched components or loose connections. Next off, overheating can stem from inadequate cooling options or dirt build-up, which can cause efficiency issues. You should also see out for brief circuits, usually triggered by liquid spills or improper handling. Additionally, biography failings can stop booting and might need firmware updates or resets. Lastly, part failings, such as damaged RAM ports or harmed ports, can disrupt try these out functionality. By recognizing these concerns early, you can save time and enhance your repair abilities.
Step-by-Step Repair Work Refine
Determining typical motherboard issues is simply the very first step; understanding how to deal with fixings is where your skills truly radiate. Begin by disconnecting the power supply and getting rid of the motherboard from the gadget. Evaluate for noticeable damage, such as burnt elements or bulging capacitors. Next, utilize a multimeter to test connections and recognize defective components. Once you have actually pinpointed the problem, carefully desolder the harmed part and change it with a new one. Ensure to solder it properly, making sure a safe and secure connection. After reconstructing, power up the tool to test your repair service. If it boots effectively, congratulations! You have actually simply understood a vital technique. Bear in mind, practice boosts your abilities, so keep explore various repairs.
Diagnosing Motherboard Problems
How can you tell if your motherboard is creating problems? If you observe odd noises, like warning throughout startup, best site this can indicate motherboard issues (MacBook screen and Motherboard repairs in South Africa).
Next, check the physical problem. Try to find scorched parts, inflamed capacitors, or any type of signs of fluid damages. If you can, reseat the RAM and other connectors, as loosened connections can simulate motherboard problems. Using analysis devices like message cards can help determine the issue, too.
If your gadget still will not react after these checks, it's time to ponder professional analysis or substitute. Keep in mind, diagnosing motherboard problems can be tricky, yet cautious monitoring and methodical checks will certainly assist you to the best verdict.
Precautionary Measures to Expand Gadget Life-span
After attending to potential motherboard problems, it's just as vital to concentrate on preventive procedures that can aid expand your gadget's lifespan. Begin by maintaining your gadget clean; dirt and particles can obstruct vents and trigger getting too hot. Use a microfiber fabric to clean the display and case routinely.
Following, purchase a high quality situation or display protector. These can protect your gizmo from accidental decreases and scrapes, maintaining its condition.
Furthermore, stay clear of revealing your device to severe temperatures and wetness. Maintain it in a cool, completely dry area, and don't leave it in a warm vehicle.
Finally, consistently update software application and applications - MacBook screen and Motherboard repairs in South Africa. Updates typically consist of safety and security spots that safeguard against susceptabilities
Often Asked Inquiries
How Much Does Expert Gizmo Repair Service Commonly Cost?
Specialist gadget repair work costs usually range from $50 to $300, depending on the device and the issue. It's smart to compare rates and review testimonials to assure you're obtaining top quality solution for your money.
Can I Repair My Gadget Without Prior Experience?
Yes, you can fix your gizmo without previous experience! Begin with easy repairs, view tutorials, and gather the right tools. With perseverance and technique, you'll get confidence and improve your skills over time.
What Are the Threats of Do It Yourself Gizmo Repair?
When you try DIY device repair, you run the risk of destructive your device further, voiding service warranties, or wounding on your own. It's essential to consider these dangers against your self-confidence and skill degree prior to diving into repairs.
How Do I Find Reliable Fixing Solutions in My Area?
What Warranty Options Exist for Repaired Gadgets?
When looking for guarantee choices on repaired gadgets, you'll typically locate choices like restricted warranties, complete satisfaction assurances, or expanded insurance coverage. Always ask your fixing service click for info about their details plans to ensure you're secured.